How Do I Apply to a Catering Lead?
To bid on a catering lead, you will submit one of the catering packages you have made on your Roaming Hunger Dashboard. This is the only way to apply to a catering lead.
Step-by-Step
Catering leads appear on the first page of your Dashboard. These leads will post for 48 hours before they expire. Once a lead is expired, you cannot submit a bid for that event; you will need to wait for new leads.
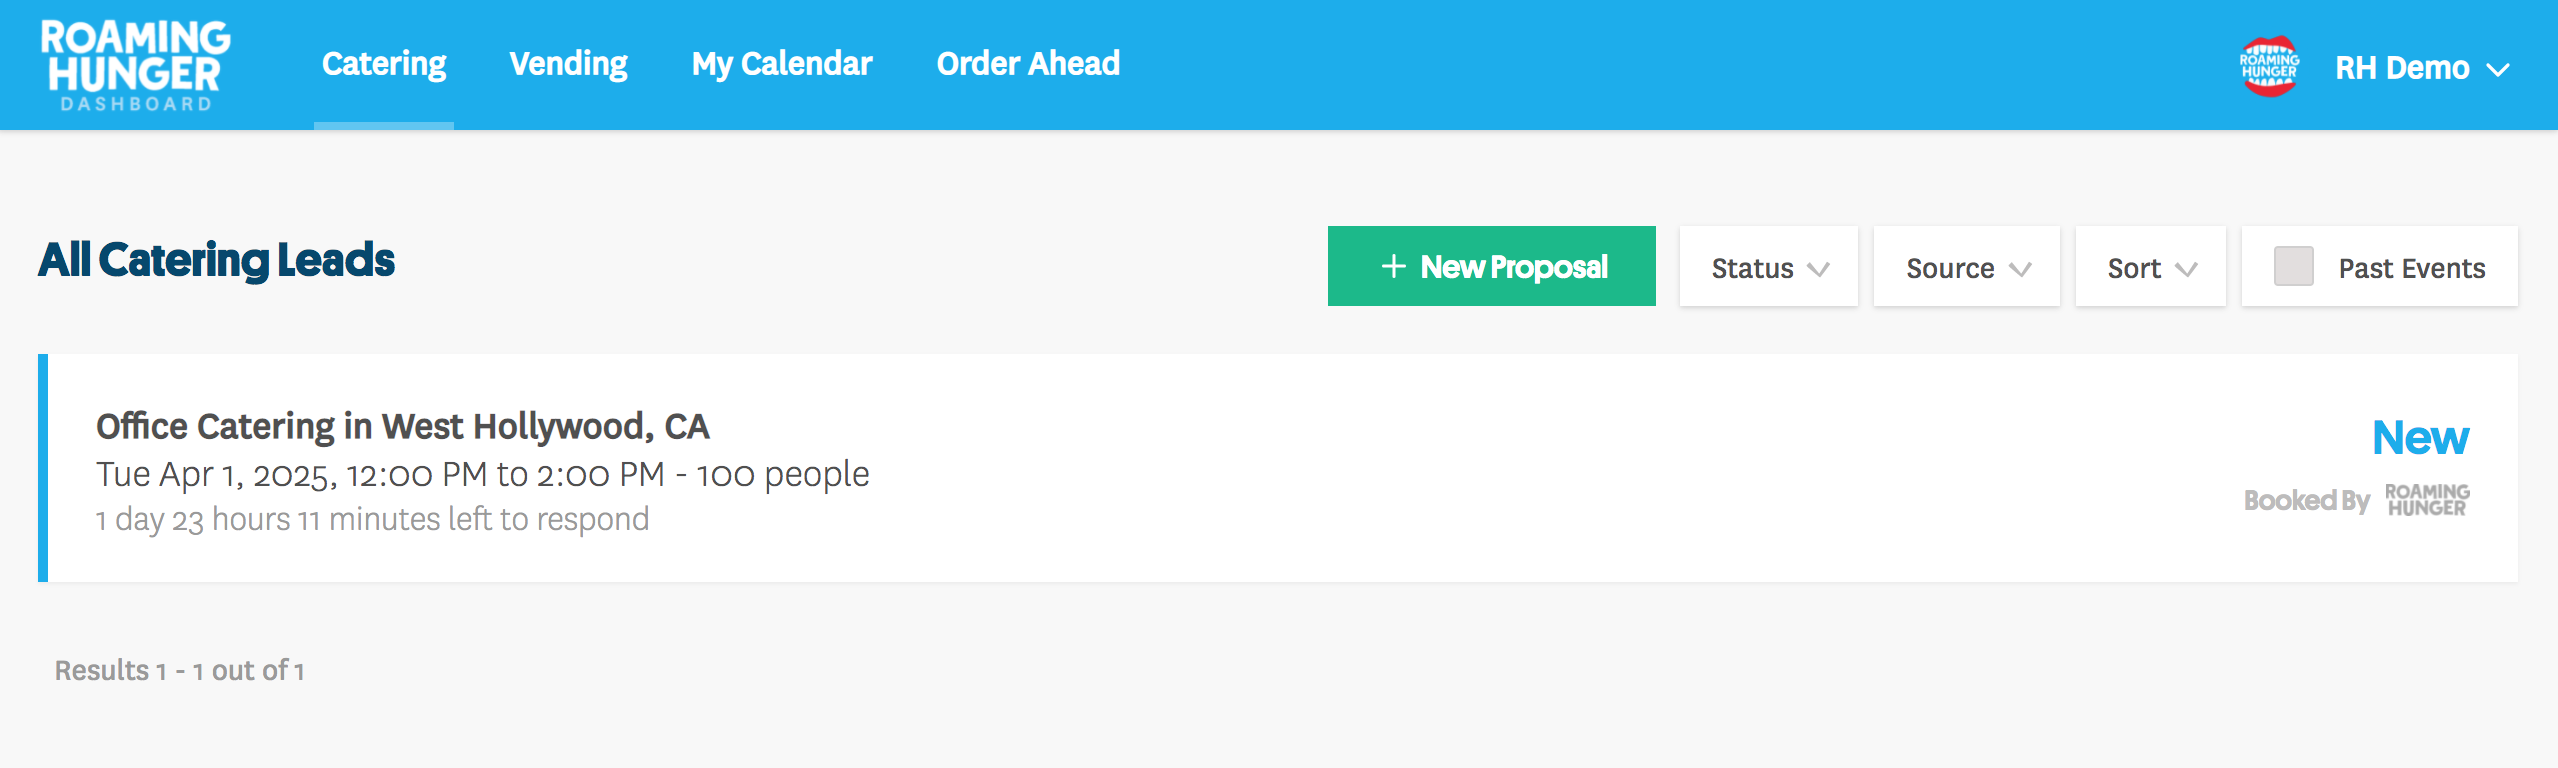
Click a lead to open it. Each lead will show you event details, including date, time, attendees, and the client's budget. Here's how to apply:
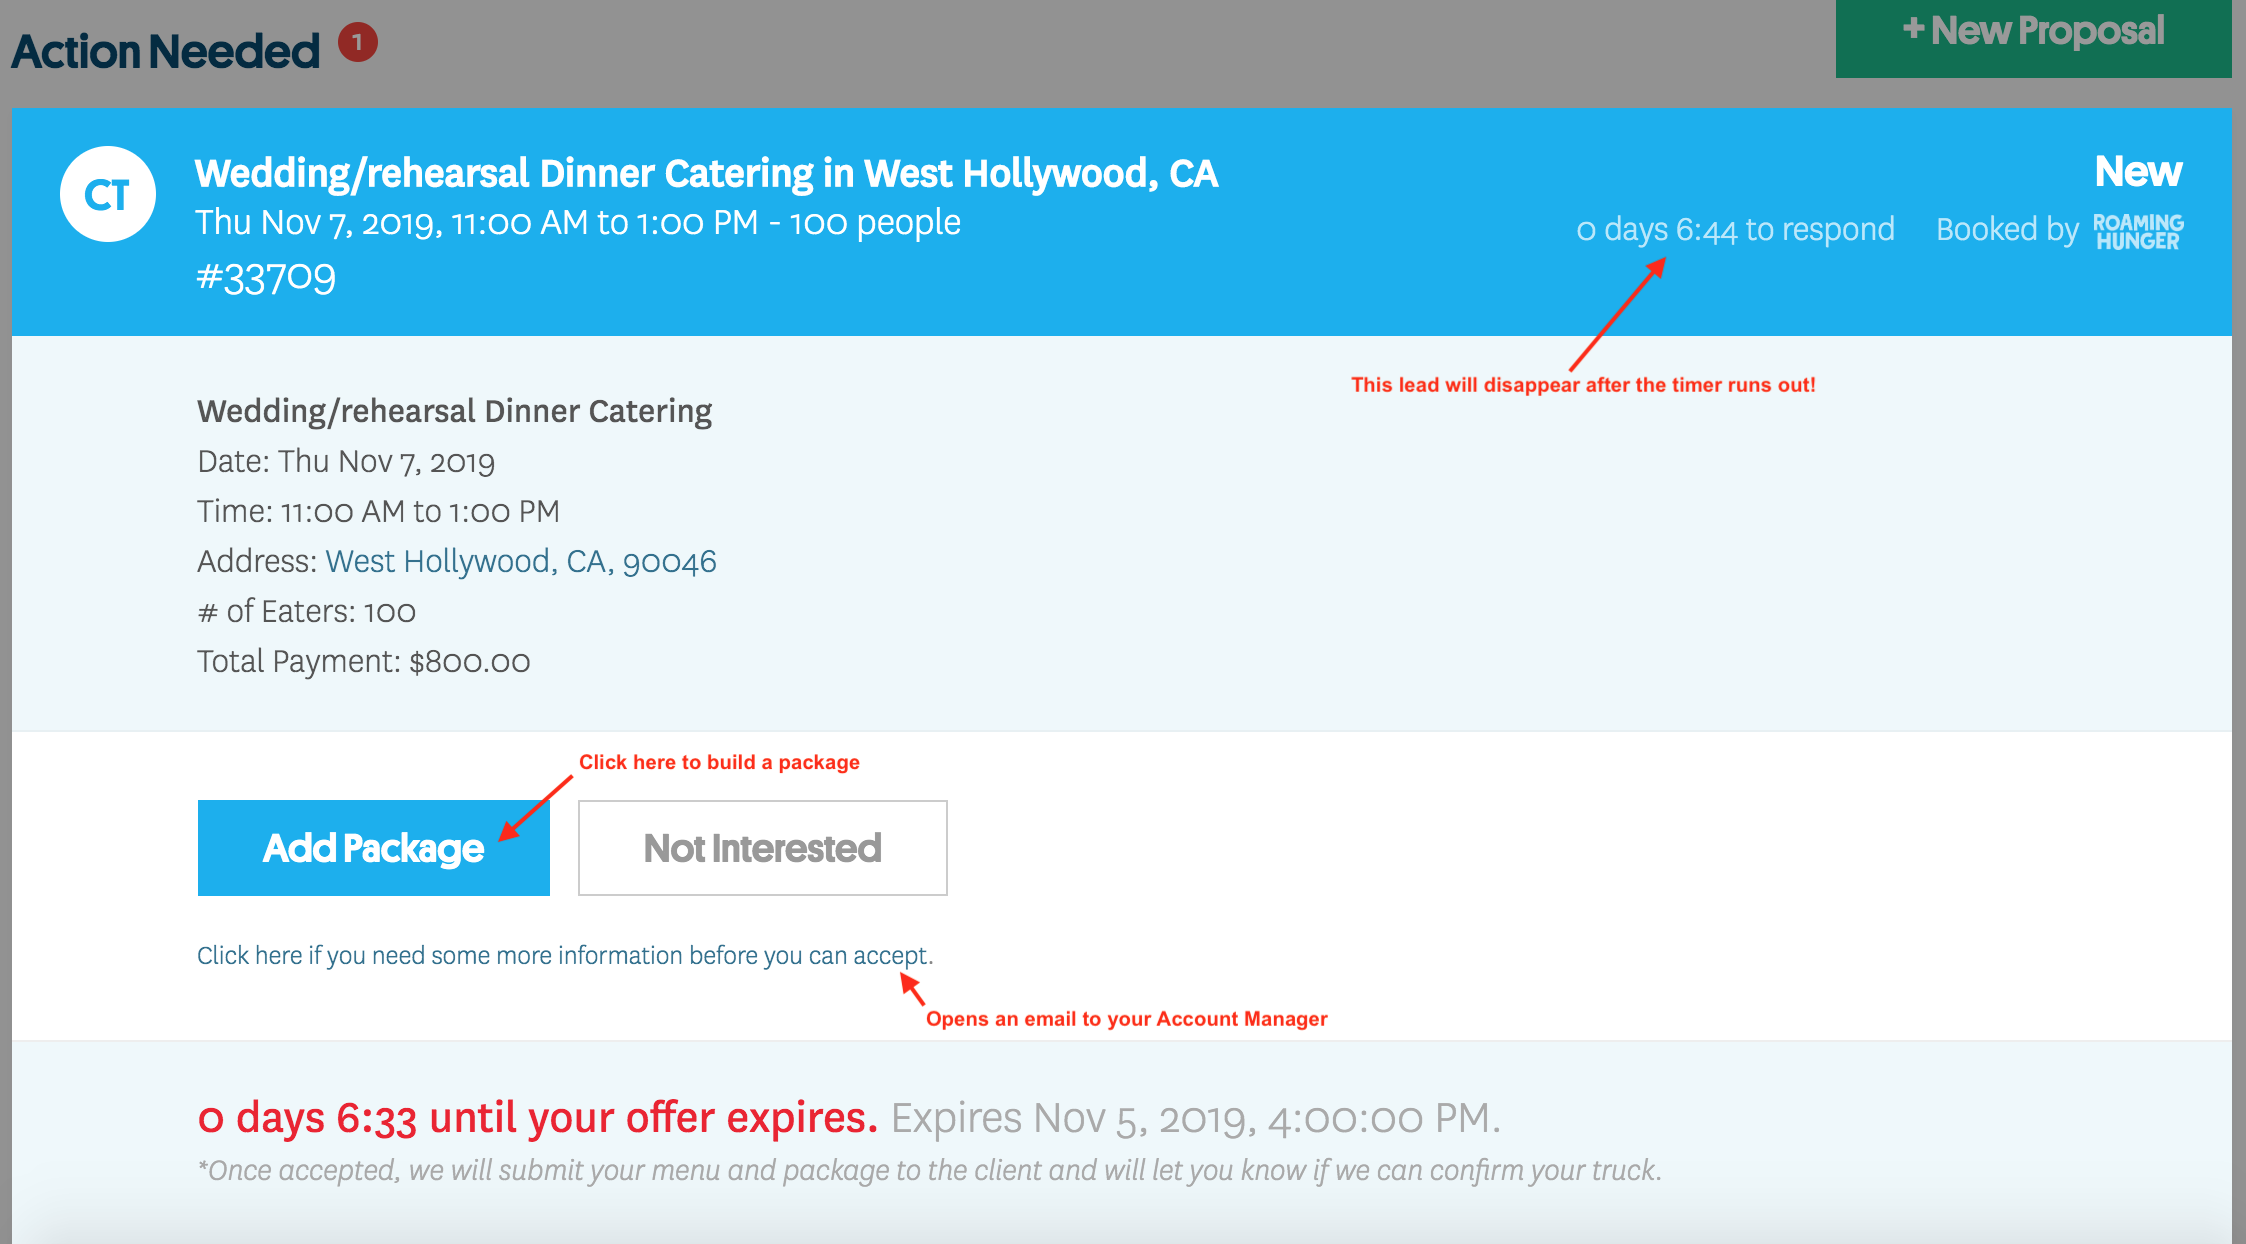
Step 1: Apply or Decline?
Click Add Package to apply to this event. If you need more information first, email the concierge via the "Click here" link directly below the Add Package and Not Interested buttons.
NOTE: Tapping "Not Interested" on an event can be a good thing. Both applying and declining will boost your overall rank on the Roaming Hunger website. We will not penalize you for turning down a lead that doesn't work for you.
Step 2: Which Service Will Be Onsite?
If you offer multiple Services, such as a truck and a trailer, a cart and dropoff, or pop-up, traditional, and cart offerings, select the one you will be bringing to this specific event. Any Service options you see while bidding have been approved by the client. If you do not see one of your Services, it is not an approved Service for ttthat

Step 3: Submit a Catering Package
If you have already created package templates, you will see them listed here. Reuse your existing package templates as many times as you like. You can customize the pricing for every event.
IMPORTANT: Set up your menu before making packages or bidding on any events.
You can also create package templates from an event bid. Here's:
If you have already created packages, you will see them displayed during the bidding process for easy selection.

If you're starting fresh, or you select Create New Package, the packages creator will open up. We will go through this process step-by-step below.

Step 3a: Name Your Package
Customize your package title, per-person price, and description by clicking the pencil icons.

Step 3b: Create Menu Sections
Sections are categories for your menu items, like Entrees or Desserts. Click Add Section to create as many sections as you'd like. If you will serve a limited selection onsite, change the On-Site Item Count.
(For example: The client may choose 3 of the 5 listed burgers to be served at the event. Onsite Item Count: 3.)

Step 3c: Add Menu Items
Once you have organized your package into sections, it's time to fill them with menu items. Menu items are listed to the right of your package builder on desktop. Click on a section (e.g. Mains) to highlight it, then click the items you want to add to it. Click the next section (e.g. Sides) to add items to that section.

To add a special item that will only live on this package, click the blue Add Custom Item button to create a new menu item. To remove any item, click it, then select Remove.

On a mobile device, the interface will look different. Instead of selecting from a sidebar, tap Add Item to open the item menu.

|

|
When you have completed your sections, click Save Package to complete the process.

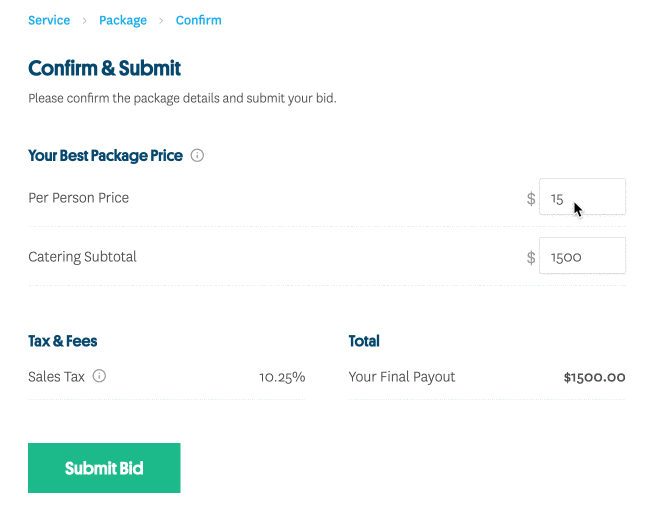
Step 4: Price Your Catering Package
The last step in applying to an event is setting your final bid price, based on the client's budget. While you can counter-offer a posted budget and may still get booked, we recommend bidding as close to the posted price as possible to stay competitive.
Customizing the Per Person Price will update the Catering Subtotal and vice versa. Make changes to the Catering Subtotal field if your business requires fees, a flat rate quote, or sales tax.*
Hit Submit Bid to add your package to the client's proposal. They will review all applicants and make their decisions.
*IMPORTANT: If you do business in the following U.S. states, you do not need to pay sales tax on payments from Roaming Hunger. We pay the sales tax directly to the governments of the following U.S. states: Alaska, Arizona, California, Colorado, DC, Delaware, Florida, Georgia, Illinois, Indiana, Kentucky, Maryland, Massachusetts, Minnesota, Montana, New Jersey, New York, Ohio, Oklahoma, Oregon, Pennsylvania, Tennessee, Texas, Utah, Virginia, Washington
If you do business in state not listed above, or in Canada, you must factor sales tax into your bid price so we can properly compensate you.
If confirmed for a catering event, you will receive an email titled "CONFIRMED CATERING" with the rest of the event's information. The Confirmed lead will appear in green at the top of your Catering tab.
Check in with your Event Coordinator for the next steps. You'll find their contact information listed on the lead when you click it.
